Journey to GSM. Part 2. Installation
Posted: June 16th, 2016 | Author: Dmitry Klyuykov | Filed under: Journey to GSM | Tags: GSM, sdr, tutorial | No Comments »To begin with the exercise, we need to install hardware and software components. First of all, we need to be sure that our computer and SDR board know each other. For that purpose, it’s necessary to install Universal Software Radio Peripheral (USRP) Hardware Driver (UHD) and UmTRX module to that driver on our machine. UHD is the device driver provided by Ettus Research for use with the USRP product family. UmTRX driver is a loadable module for the UHD library. Loading UmTRX driver allows any of the myriad of UHD applications to work with UmTRX just like with any other UHD compatible device. Below we describe how to install the UHD library (The UHD version supported by the current UmTRX driver is 003.008) and UmTRX module for it.
We will use Ubuntu 14.04 for our purposes. Basically, it’s possible to use any Ubuntu system, but we tested everything on 14.04 and guarantee that it will work fine. UHD library built with loadable modules support could be downloaded from Josh Blum’s PPA. Thus, we need to open Terminal and enter:
$ sudo apt-get install python-software-properties
$ sudo add-apt-repository ppa:guruofquality/pothos
Python-software-properties provides the add-apt-repository binary, which is necessary to install a new ppa (Personal Package Archive, is a collection of software not included in Ubuntu by default, https://help.launchpad.net/Packaging/PPA) easily. Pothos repository contains a proper UHD package for UmTRX. Update the cache of the Software Center repository:
$ sudo apt-get update
To install UHD driver from that repository, we should open Ubuntu Software Center. From drop-down menu of All Software button choose Pothos and scroll down until «uhd» package appears. That’s the one we need to install.
![]()
It’s also possible follow the standard procedure described in the UHD build guide to build it from the source (http://files.ettus.com/manual/page_build_guide.html).
Once UHD has been installed the UmTRX module must be built and installed over it. We have just installed Ubuntu 14.04 so some necessary software for building UmTRX module is abscent. It’s easy to get, though!
$ sudo apt-get install git
$ sudo apt-get install libboost-all-dev
$ sudo apt-get install build-essential
$ sudo apt-get install cmake
Git is a widely used version control system for software development. Boost is a set of libraries for the C++ programming language that provide support for tasks and structures such as linear algebra, pseudorandom number generation, multithreading image processing, regular expressions, and unit testing. The build-essentials is a reference for all the packages needed to compile a debian package. It generally includes the gcc/g++ compilers an libraries and some other utilities.
We are ready to install UmTRX module right now:
$ git clone https://github.com/fairwaves/UHD-Fairwaves.git
$ cd UHD-Fairwaves/host
$ mkdir build
$ cd build
$ cmake ../
$ make
In this part we cloned Fairwaves repository to the local folder, created a folder for the installation and built the module. To install the driver with a package:
$ cpack
$ sudo dpkg -i umtrx_*.deb
We highly recommend to use Josh Blum’s UHD driver as we based the development of UmTRX driver on it.
It is suitable moment to setup and boot UmTRX board to ensure if the installation went correctly.
The UmTRX Lab Package includes a power supply, GPS antenna and pigtail wires for GSM antennas. The user have to take care of assembly and cooling. A 3-pin mains lead is required.
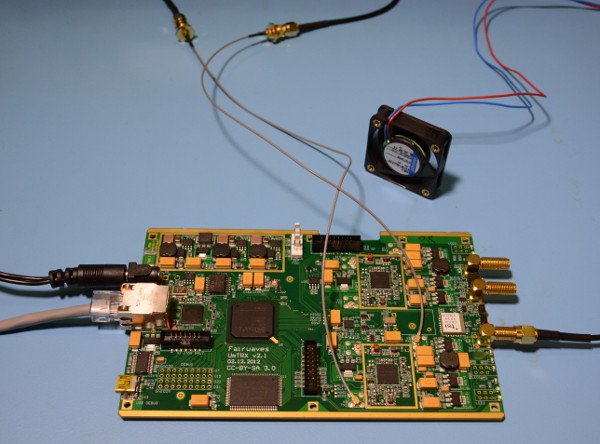
Cooling is necessary and the heat generated must be dissipated in a stable manner in order to avoid permanent damage of the UmTRX. Cooling using fans is easy to implement but is mostly suited to indoor use. Two fans may be connected via the connectors X17 (FAN1) and X18 (FAN2). FAN1 is constantly powered and FAN2 is automatically switched on/off by U35 (MAX6665ASA45) when the temperature is around 45°C. The maximum DC current of FAN2 must be less than 400mA.
TX and RX antennas should be selected according to the application. Damage may occur if UmTRX is set to transmit without a suitable 50 ohm load connected! We will use antennas from the box.
As we plugged power and cooling, we need to connect our board to computer via ethernet cable directly or via switch. For now, UmTRX does not support 100M Ethernet and it will not be recognized if your computer does not support gigabit Ethernet. Though, if your PC ethernet port supports only 100 Mbit/s, you may use 1GBit/s network switch. By default UmTRX has a static IP address 192.168.10.2/24, so it is recommended to set your computer’s IP address to 192.168.10.3/24.
It’s easy to check, if UmTRX and UHD were installed properly:
$ uhd_find_devices
If the result was like that, we made everything right:

We may also probe the properties of the attached device:
$ uhd_usrp_probe 192.168.10.2
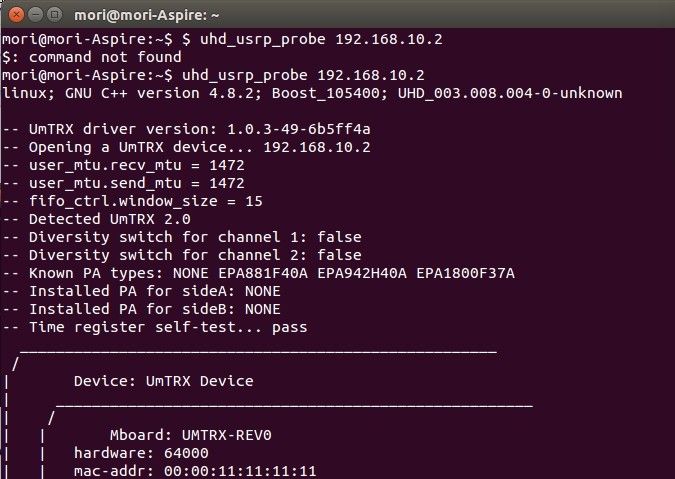
The output of the command shows different properties of our UmTRX, such as driver version and channel settings.
The next step is installation of GNU Radio package into our Ubuntu system. We recommend to use build-gnuradio script as it would allow to install the latest version of the package and not to overwrite our existing UHD driver. Create a folder in your /home to avoid any issues with file permissions.
$ wget http://www.sbrac.org/files/build-gnuradio && chmod a+x ./build-gnuradio && ./build-gnuradio prereqs gitfetch gnuradio_build
We are using additional parameters prereqs, gitfetch and gnuradio_build to check if our prerequisite software is installed (and install it if necessary), copy the installation files to created folder and build GNU Radio only, without UHD driver. The process takes about 2 hours, so please be patient.
To have more options in experiments with SDR, it’s helpful to install Osmocom GNU Radio Blocks (http://sdr.osmocom.org/trac/wiki/GrOsmoSDR). By using the OsmoSDR block we can take advantage of a common software API in our application(s) independent of the underlying radio hardware.
$ git clone git://git.osmocom.org/gr-osmosdr
$ cd gr-osmosdr
$ mkdir build
$ cd build
$ cmake ../
$ make
$ sudo make install
$ sudo ldconfig
So, the script finished it’s work and we are ready to have some fun with GNU Radio!
Leave a Reply